In this example we will see different ways of using spring mvc checkbox tag.
You can either use
<form:checkbox path="<somevariableName>" /> or
<form:checkboxes path="<somevariableName>" items="<someListName>" /> based on your requirements.
Spring MVC Checkbox Tag can be implemented using 4 different ways
1. Using a boolean variable
|
1 |
<form:checkbox path="visaApproved" /> |
2. Using a hard-coded list at Client Side
|
1 2 3 |
<form:checkbox path="languagesKnown" value="C++" label="C++" /> <form:checkbox path="languagesKnown" value="JAVA" label ="JAVA" /> <form:checkbox path="languagesKnown" value=".Net" label=".Net" /> |
3. Using a dynamic list from Server Side
|
1 |
<form:checkboxes path="hobbies" items="${availableHobbies}" /> |
4. Using a dynamic Map from Server Side (Defining label and value)
Using a map or a user defined object can be useful when you want to differentiate between the data displayed to the user and data passed back to the server.
|
1 |
<form:checkboxes path="socialProfiles" items="${availableSocialProfiles}" value="${key}" label="${value}" /> |
Spring MVC Checkbox Tag – Complete Example
We have create a complete example using all the possible ways of implementing the checkbox/checkboxes in spring
1. Create a Model class
|
1 2 3 4 5 6 7 8 9 10 11 12 13 14 15 16 17 |
package com.kscodes.sampleproject.model; import java.util.List; import java.util.Map; public class Employee { private boolean visaApproved = true; private List<String> languagesKnown; private List<String> hobbies; private List<String> socialProfiles; // --- GETTER SETTER METHODS } |
2. Create a Controller Class that will pass data and the model to the view
|
1 2 3 4 5 6 7 8 9 10 11 12 13 14 15 16 17 18 19 20 21 22 23 24 25 26 27 28 29 30 31 32 33 34 35 36 37 38 39 40 41 42 43 44 45 46 47 48 49 50 51 52 53 54 55 56 57 |
package com.kscodes.sampleproject.controller; import java.util.ArrayList; import java.util.HashMap; import java.util.List; import java.util.Map; import org.springframework.stereotype.Controller; import org.springframework.ui.Model; import org.springframework.validation.BindingResult; import org.springframework.web.bind.annotation.RequestMapping; import org.springframework.web.bind.annotation.RequestMethod; import org.springframework.web.servlet.ModelAndView; import com.kscodes.sampleproject.model.Employee; @Controller @RequestMapping("/employee") public class EmployeeController { @RequestMapping(method = RequestMethod.GET) public ModelAndView showEmployeeForm() { Employee employee = new Employee(); // Add the command object to the modelview ModelAndView mv = new ModelAndView("employee"); mv.addObject("employee", employee); // Add dynamic data to the Hobbies list List<String> availableHobbies = new ArrayList<String>(); availableHobbies.add("Reading"); availableHobbies.add("Dancing"); availableHobbies.add("Singing"); availableHobbies.add("Doing Nothing"); mv.addObject("availableHobbies", availableHobbies); // Add dynamic data to Social Profiles Map<String, String> availableSocialProfiles = new HashMap<String, String>(); availableSocialProfiles.put("linkedin", "LinkedIN"); availableSocialProfiles.put("facebook", "FaceBook"); availableSocialProfiles.put("twitter", "Twitter"); availableSocialProfiles.put("google+", "Google Plus"); mv.addObject("availableSocialProfiles", availableSocialProfiles); return mv; } @RequestMapping(method = RequestMethod.POST) public String submitForm(Model model, Employee employee, BindingResult result) { model.addAttribute("employee", employee); return "success"; } } |
3. Create View to show the checkboxes to the user.
|
1 2 3 4 5 6 7 8 9 10 11 12 13 14 15 16 17 18 19 20 21 22 23 24 25 26 27 28 29 30 31 32 33 34 35 36 37 38 39 40 41 42 43 44 45 |
<%@taglib uri="http://www.springframework.org/tags/form" prefix="form"%> <%@ taglib prefix="c" uri="http://java.sun.com/jsp/jstl/core"%> <html> <head> <title>Spring MVC - Employee</title> </head> <body> <h2>Employee Data</h2> <table> <tr style="height:75px"> <td>is Visa Approved - </td> <td>${employee.visaApproved}</td> </tr> <tr style="height:75px"> <td>Selected Programming Languages - </td> <td> <c:forEach var="languageKnown" items="${employee.languagesKnown}"> ${languageKnown} <br /> </c:forEach> </td> </tr> <tr style="height:75px"> <td>Hobbies - </td> <td> <c:forEach var="hobby" items="${employee.hobbies}"> ${hobby} <br /> </c:forEach> </td> </tr> <tr style="height:75px"> <td>Selected Social Profiles - </td> <td> <c:forEach var="socialProfile" items="${employee.socialProfiles}"> ${socialProfile} <br /> </c:forEach> </td> </tr> </table> </body> </html> |
4. Create a success page to show the data selected by user
|
1 2 3 4 5 6 7 8 9 10 11 12 13 14 15 16 17 18 19 20 21 22 23 24 25 26 27 28 29 30 31 32 33 34 35 36 37 38 39 40 41 42 43 44 45 |
<%@taglib uri="http://www.springframework.org/tags/form" prefix="form"%> <%@ taglib prefix="c" uri="http://java.sun.com/jsp/jstl/core"%> <html> <head> <title>Spring MVC - Employee</title> </head> <body> <h2>Employee Data</h2> <table> <tr style="height:75px"> <td>is Visa Approved - </td> <td>${employee.visaApproved}</td> </tr> <tr style="height:75px"> <td>Selected Programming Languages - </td> <td> <c:forEach var="languageKnown" items="${employee.languagesKnown}"> ${languageKnown} <br /> </c:forEach> </td> </tr> <tr style="height:75px"> <td>Hobbies - </td> <td> <c:forEach var="hobby" items="${employee.hobbies}"> ${hobby} <br /> </c:forEach> </td> </tr> <tr style="height:75px"> <td>Selected Social Profiles - </td> <td> <c:forEach var="socialProfile" items="${employee.socialProfiles}"> ${socialProfile} <br /> </c:forEach> </td> </tr> </table> </body> </html> |
Execution
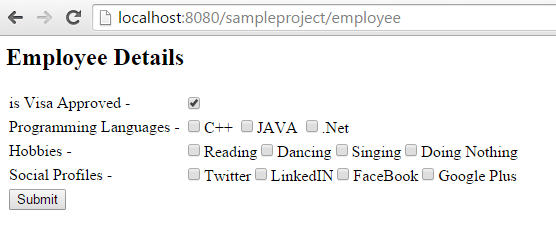
After Selecting some values you will see the output
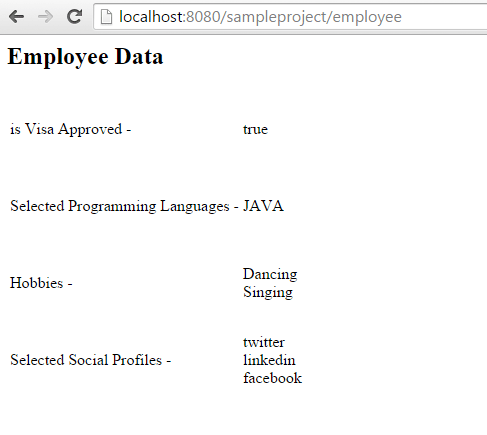
Note that the values selected for the Social Profiles are the Key’s that we had passed in the Map from Server Side.