A well-organized Spring Boot project structure:
- Makes your code easier to understand and maintain
- Helps collaborators navigate quickly
- Enables smoother testing, deployment, and scaling
Spring Boot projects follow a convention-over-configuration model, which gives you a standard folder layout.
Let’s break it all down 👇
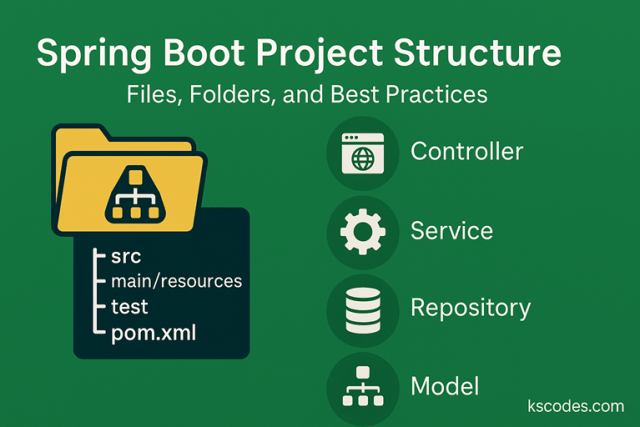
📁 Default Spring Boot Directory Layout
When you generate a project (via Spring Initializr), this is what you get:
|
1 2 3 4 5 6 7 8 9 10 11 12 13 14 15 16 17 18 19 20 21 22 |
myproject/ ├── pom.xml ├── src/ │ ├── main/ │ │ ├── java/ │ │ │ └── com/ │ │ │ └── yourdomain/ │ │ │ └── myproject/ │ │ │ └── MyProjectApplication.java │ │ └── resources/ │ │ ├── application.properties │ │ ├── static/ │ │ ├── templates/ │ │ └── META-INF/ │ └── test/ │ └── java/ │ └── com/ │ └── yourdomain/ │ └── myproject/ │ └── MyProjectApplicationTests.java |
📦 File & Folder Breakdown
1. pom.xml (or build.gradle)
Defines your project’s:
- Dependencies
- Plugins
- Build instructions
It’s the heart of your project’s setup if using Maven.
2. src/main/java
This is where all your application code lives.
Follow this structure:
|
1 2 3 4 5 6 7 8 9 10 |
com.yourdomain.myproject ├── controller/ ├── service/ ├── repository/ ├── model/ └── MyProjectApplication.java |
| Folder | Purpose |
|---|---|
controller/ | REST Controllers, API endpoints |
service/ | Business logic layer |
repository/ | Spring Data JPA repositories |
model/ | Entity or DTO classes |
| Main class | Starts the app (annotated with @SpringBootApplication) |
3. src/main/resources
Contains non-Java resources:
| File/Folder | Purpose |
|---|---|
application.properties or .yml | Configuration settings |
static/ | Static content (CSS, JS, images) |
templates/ | Thymeleaf or FreeMarker HTML templates |
META-INF/ | Metadata, such as MANIFEST.MF |
4. src/test/java
This is your test codebase.
Follow the same package structure as main/java for:
- Unit tests
- Integration tests
- Mock-based testing
Spring Boot uses JUnit 5 by default.
🧰 Best Practices for Spring Boot Structure
✅ 1. Use Layered Architecture
Organize your code by function:
- Controller → Service → Repository
- Avoid putting everything in the controller
✅ 2. Group Features (Modular Structure)
For large apps, go feature-first instead of layer-first:
|
1 2 3 4 5 6 7 8 |
product/ ├── ProductController.java ├── ProductService.java ├── ProductRepository.java ├── Product.java |
This improves modularity and testability.
✅ 3. Use DTOs (Don’t Expose Entities Directly)
Map entity objects to Data Transfer Objects (DTOs) to control API response shape.
✅ 4. Keep application.properties Organized
Use:
|
1 2 3 4 5 6 |
spring.datasource.url= spring.datasource.username= app.feature.toggle.enabled=true |
Use profiles like application-dev.properties, application-prod.yml for environment separation.
🚨 Common Mistakes to Avoid
| Mistake | Why it’s bad |
|---|---|
| All logic in controller | Violates separation of concerns |
| No structure (all classes in root) | Becomes unmanageable as app grows |
| Skipping test packages | Leads to hard-to-maintain code |
| Using default package | Causes scanning issues, bad practice |
🎯 Summary
A standard Spring Boot project structure looks like this:
|
1 2 3 4 5 6 |
src/ ├── main/java # Your code ├── main/resources # Configs, templates, static files └── test/java # Your test code |
With:
- Controllers handling input/output
- Services handling business logic
- Repositories handling data access
- Models representing data objects
Following these best practices ensures your codebase stays clean, modular, and scalable — even as your app grows.